![]()
Speeding and young people has recently become a hot topic in the popular media. Teenagers are bombarded with movies and TV shows glorifying excessive speed, and with tragic news stories warning of the dangers of speed. But their understanding of why speed is dangerous is minimal. This lesson, though it does not discuss car accidents in depth, will make students more aware of the factors involved in accidents.
![]()
Lesson Outline
- Equipment Explanation
The demonstration apparatus consists of a remote control car or truck, modified with a light sensor which cuts power from the battery to the motor when stimulated. A flashlight beam is shone perpendicular to the path of the car, which ensures the power to the car is cut off at the same point on every run. This is the point that measurements of stopping distance are made from.
- Discussion of Error
The demonstration has a large error, mostly due to the impossibility of making the car take the exact same path each time it is run. Variation in the path leads to variation in the position the power is turned off at, and therefore variation in the zero-point. Also, a meter stick is used to make the distance measurement, which is not very accurate. Asking the students to brainstorm some sources of error opens a discussion about validity and reliability, as well as acceptable sources of error. Students will also understand the error is common in the laboratory, and that as more data are used to find an average value, the accuracy of the results increases.
- Determination of Velocities
The car is driven on a relatively long path at low speed. The students are given stop watches, or may use their own digital watches, and all are asked to measure the time the car takes to travel this path. This is an opportunity to demonstrate error in taking measurements, as the students' measurements should vary over a range. The time average is found and the velocity of the low sped setting is calculated. This process is repeated on a high speed setting.
-
Derivation of Stopping Distance Formula
Stopping distance can be derived from work and energy, or from kinematics. The lesson overheads use work and energy because the math is simpler, and younger students may not have had much kinematics exposure. A review of relevant formulas which the students should already know is provided first:
F = ma
W = Fd
W = ΔKE
KE = mv2/2
In the demonstration, final kinetic energy is zero, because the truck is stopped. By equating the work formulas, substituting in Newton's first law, and eliminating mass, we find stopping distance
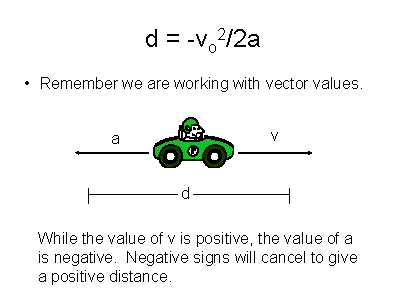
d = -vo2/2a
Students are asked to explain the negative sign. The students should understand that the acceleration vector is in the negative direction, and its negative value makes the resulting value for stopping distance positive.

- Determination of Stopping Distances
At this point a student is asked to drive the truck on low speed from the launch pad past the light, and to measure the distance the truck took to stop. This is repeated a few times so a good average value can be found. The students are asked to calculate the acceleration of the truck, and to predict the truck's stopping distance on high speed. A student the drives the truck from the launch pad past the light on high speed several times, and measures the distances. Students will see that their values predicted from the formula are equal, within a reasonable error, to the actual distance.
- Discussion of Accidents and Compression
The lesson presents an excellent opportunity to briefly discuss speed and injury. The students have just seen that stopping distance is proportional to the square of the initial velocity. This means twice the speed causes four times as much compression (if forces are constant). Students can see that a little extra speed greatly increases the likelihood of injury.
-
Discussion of Breaking Force
The students are asked to answer the first breaking force question on their handout. Some students will say that the breaking force comes from the driver's foot. However, the calculations show that the force to stop the car is equivalent to 1019 kg, a force too large for a for to exert. The depression of the break stimulates the breaking mechanism in the car, which then slows the tires. However, it is friction that stops the car.
- Friction
If time permits, a brief explanation of rolling friction and mini-quiz can be given with the provided slides. Unfortunately, no demonstration is currently available for this topic.
- Answers to Worksheet
Students answer the rest of the handout questions, and the answers may be collected or reviewed.
- Anti-Lock Breaking Systems
If time permits, anti-lock breaking systems can be discussed. Many students have never experienced a skid while driving because of anti-lock breaks.
- Question and Answer Period
![]()