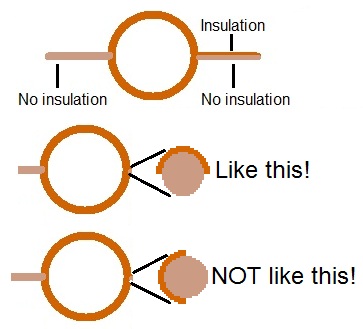
Cut off a length of magnet wire and wind it into a coil. Make it whatever shape and number of windings that you like - even one or two windings will work. Leave some wire on the ends of the coil, and when itís wound, wrap these around or bend them so that they stick out at opposite ends of the loop. These will be the contacts.
Using a sharp edge (wire cutters or a pair of scissors work fine), scrape all the insulation off one of the contact wires. On the other contact wire, scrape off only the insulation on one side, so that this side faces one of the edges of the loop:

Wrap tape around the two edges of the loop, a different colour of tape on each edge. If you use a stroboscope to measure the speed of rotation, this will allow you to distinguish between the two edges.
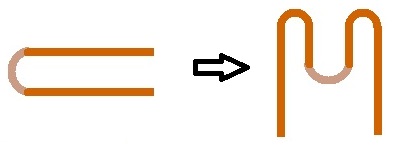
Cut off two pieces of magnet wire with equal length, about 25 cm. Longer is better, since you can always trim it down later if it is too long. Using a sharp edge, scrape off two or three cm of insulation at the middle of each piece of wire:

Bend each wire into a U-shape at the place where you scraped off the insulation. A few centimeters up from the first bend, bend the two ends back down.

Bend the two ends perpendicular to the plane of the triple-U shape, to make "feet". These will be attached to the card, and the coil will sit in the central U to rotate, so make sure you leave enough distance between the feet and the bottom of the central U for both the magnet and the coil.
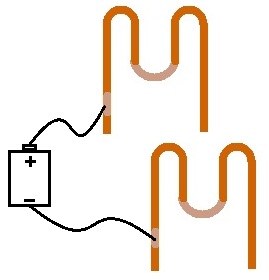
Cut out a section of the posterboard, about 10 or 15 cm square. Glue or tape the feet to the square of posterboard so that the cerntral Uís line up, and far enough apart that the coil can fit between them. It should look something like this:

Along one of the legs on each of these supports, scrape off some more insulation. Using the electrical wire or battery case, connect the battery to these spots:

Place the coil between the two supports, so that its contact wires rest in the two central, stripped bends. Place the magnet on the base, underneath the coil. The motor is now complete and should run; the coil may need a slight kick to make it start turning.
To build a simple generator, you need:
My generator used four neodymium disk magnets for the rotor, and lego collected from various kits for the structural elements. The coil is very fine magnet wire, and has three hundred turns. This was sufficient to generate about 2.5 V when the rotor was spun by hand.
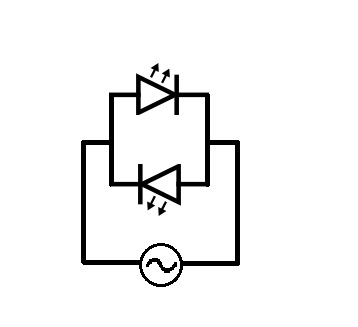
A simple circuit to demonstrate that the motor produces AC current is as follows:

One LED will light only when the current is in one direction; the other will light only when the current is in the opposite direction. Thus the two LEDs will flash on and off in alternating sequence when powered by our AC generator.