 UBC PHYS420C
Brain-Machine
Interface
Project
Alejandro Esquivel
UBC PHYS420C
Brain-Machine
Interface
Project
Alejandro Esquivel
UBC PHYS420C
Brain-Machine
Interface
Project
Alejandro Esquivel
UBC PHYS420C
Brain-Machine
Interface
Project
Alejandro Esquivel
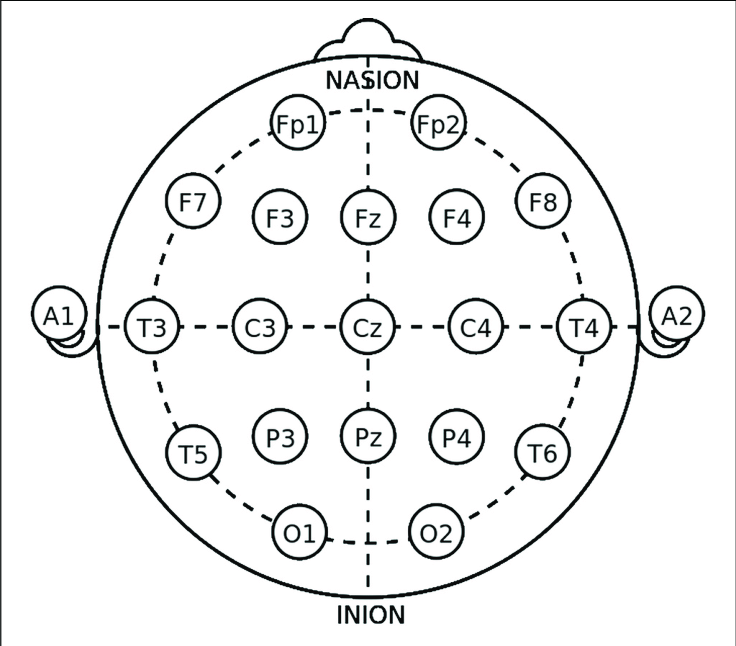
The project I decided to build as a part of this course PHYS420C (Winter 2019), was a basic Brain-Machine-Interface (BMI). Using an Electroencephalogram (EEG) voltage fluctuations on the scalp as a result of neurons firing could be measured, where these voltage fluctuations arise from the brain responding to external stimuli (visual information, auditory, and sensory), motor control (movement of arms, legs, hands, ect) or thoughts. The brain can be divided into a finite number of sections where each section specializes in different tasks, the occipital lobe for example is the central part of the brain for processing visual information. Therefore by placing an electrode on the scalp in the vicinity of a section of interest in the brain allows us to make inferences about what information the brain is processing.
The purpose of the BMI that was constructed was to be able to play a browser based game “Flappy Bird”. By concentrating (being in an alert state) the desired outcome was to be able to move the bird up to avoid obstacles and move the bird down by relaxing (being in a state of rest). This was achieved by placing electrodes on the frontal lobe which is a section of the brain associated with attention and short-term memory. Lower frequency [8-13 Hz] voltages (Alpha waves) in this region are associated with inattentiveness and relaxation whereas higher frequency voltages [14,30 Hz] (Beta Waves) are associated with stimulation and attention. Therefore by computing the average bandpower of the corresponding frequency ranges [8-13 Hz] Alpha and [13-30 Hz] Beta, one could deduce whether someone is in an attentive or relaxed state.
Once of the challenges with this project was that different people have different magnitudes Beta and Alpha signals when being relaxed or attentive. There are many factors at play including the quality of the contact of the electrode to the scalp (things like hair product or dandruff affect signal quality), neurological conditions like ADD or ADHD which have a direct impact on one's ability to reproduce an attentive state, and also an anxious state may impact the ability to produce a relaxed state. As a result, in order to obtain better accuracy predictions a simple machine learning classification algorithm was used (Logistic Regression) to classify relaxed/attentive states using bandpower measurements as input features.
The purpose of this project is to get students excited about Physics, and this project attempts to do this by highlighting the breadth of a Physics education which can be used to build something that would seem exclusive to other subjects such as Biology & Electrical Engineering. Moreover, I found it was important to also build something that has clear applications to the real world in order to also emphasize that a Physics education can also add value to entrepreneurially inclined students or future applied scientists.
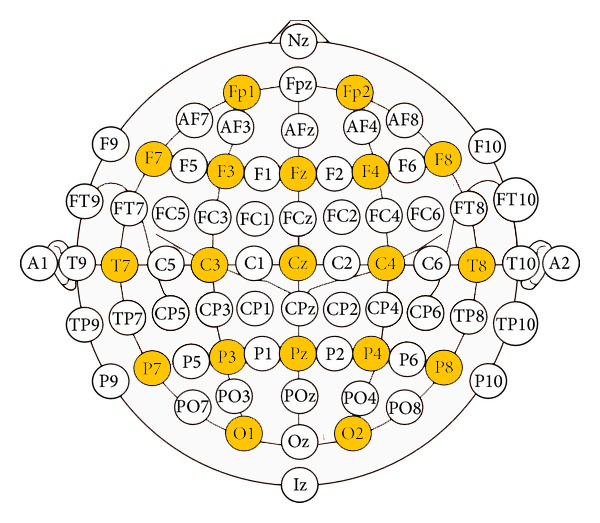
For this project I opted to get an electrode cap which came with the cap itself and electrodes in pre-defined positions according to the 10-20 system. The cap and gel were both purchased on the following website OpenBCI.
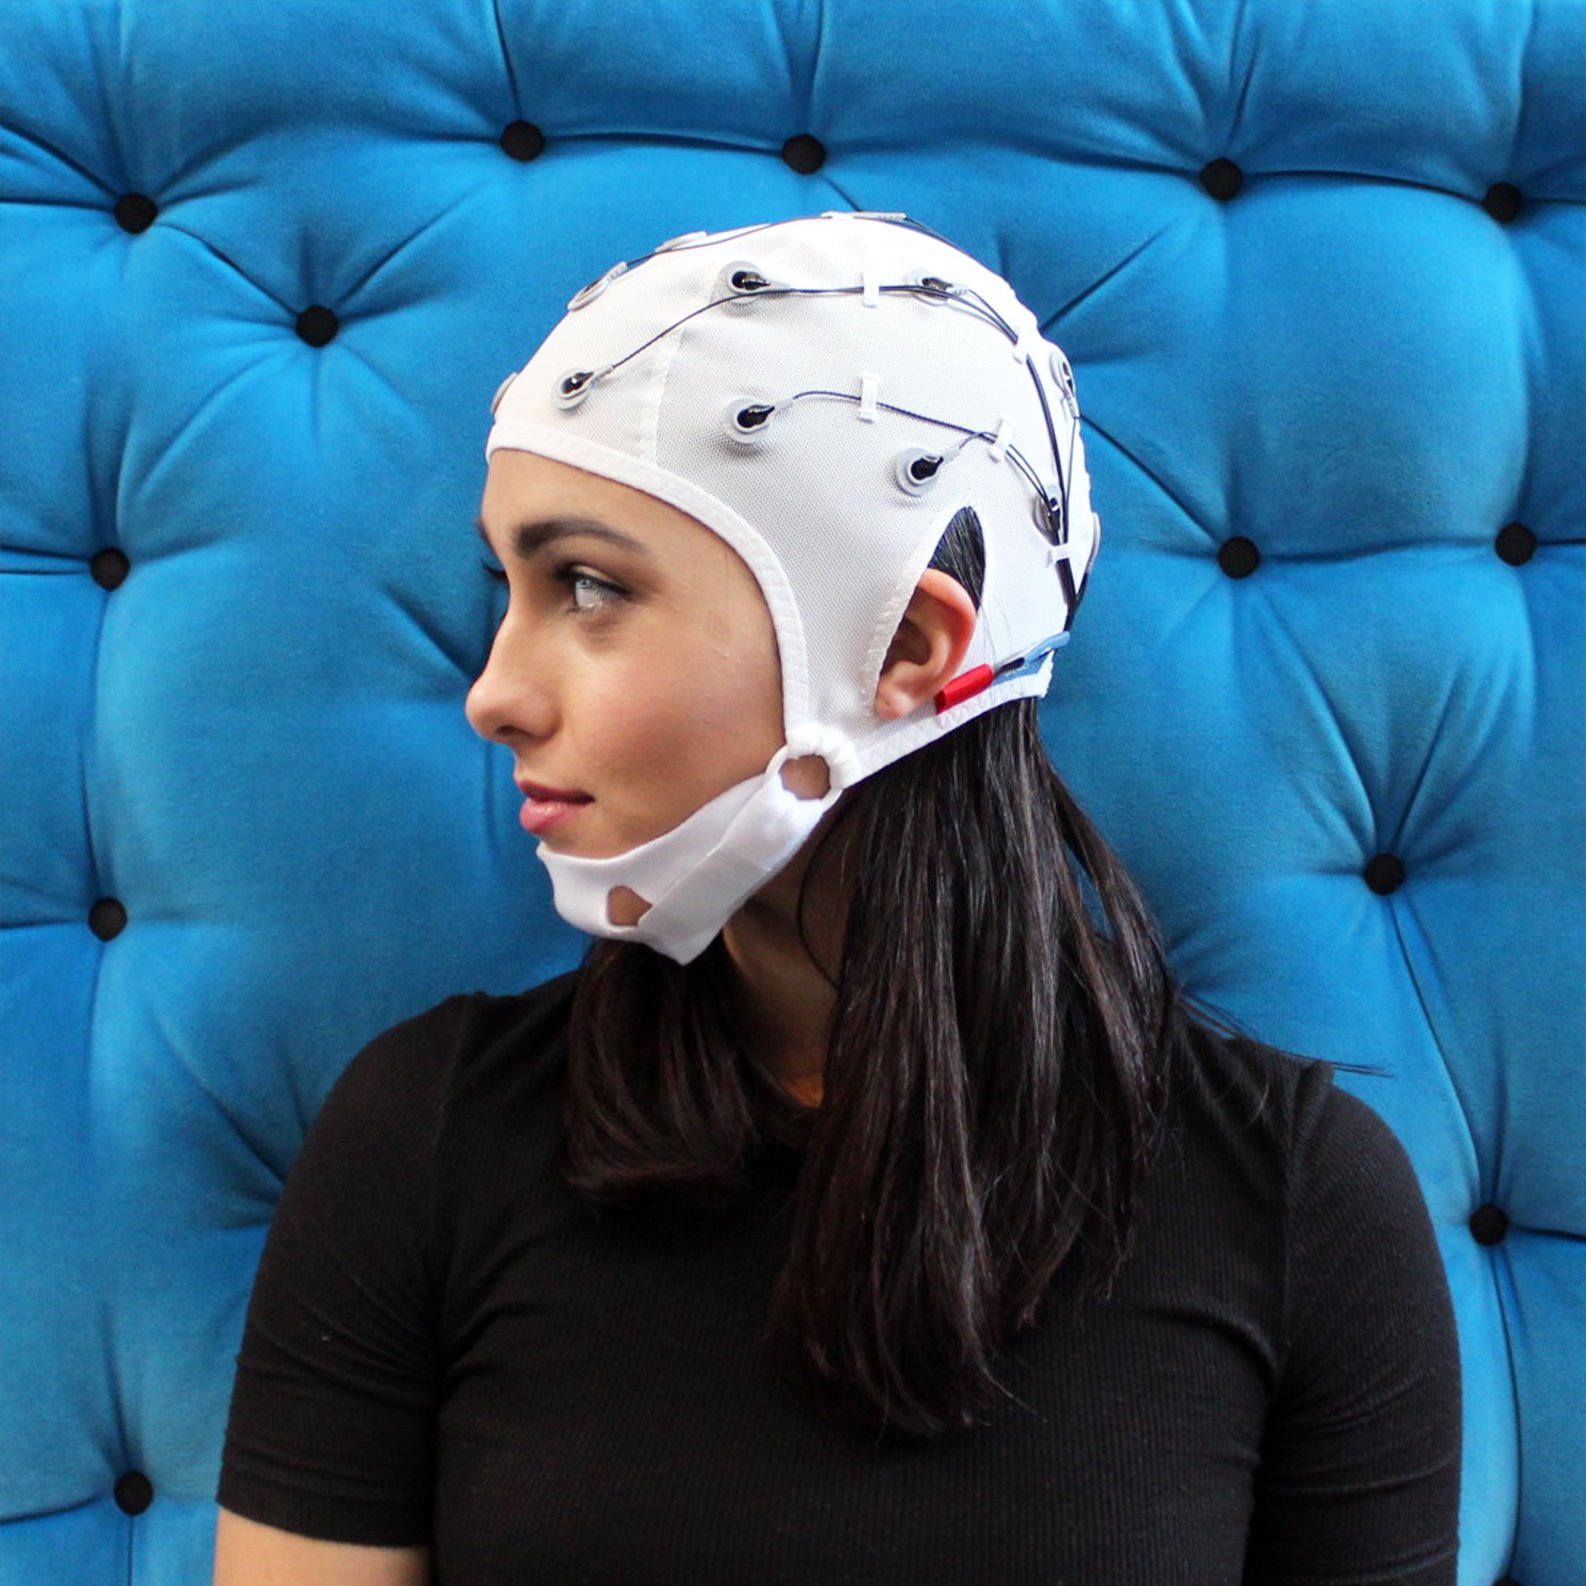
The required materials to construct a DIY EEG cap include either gold or silver electrodes which can be placed on the scalp of a subject, and electrode gel which increases the electrical contact of the electrodes to the scalp and reduces unwanted signal artifacts as a result of movement. In addition a swimming cap can be used in order to hold the electrodes in fixed positions (in regions of interest according to 10-20 system) on the scalp. The following website can be used to buy such electrodes and electrode gel https://bio-medical.com/.
All individual electrodes and electrode caps use the same standard DIN 42802 connector, which means that in order to interface to breadboards for testing purposes will require an adapter such as one that can be obtained from OpenBCI
As 60Hz alternating current (AC) powers our home devices, this frequency may find its way into devices attempting to measure minute signals (such as EEGs or ECGs) and are the biggest source of noise for medical devices.
The voltage fluctuations in the scalp are minute, they are in the microvolt range and thus require a significant amount of amplification. In order to amplify such a small signal an instrumental amplifier is required, which are a configuration of differential op-amps (transistor circuits which amplify differences in voltages) these are widely in biomedical applications where low-noise amplification is required (High Common mode rejection ratio [CMRR] - any noise present on both inputs of the amplifier will be reduced).
Furthermore, a combination of bandpass filters can be used to remove signals of frequencies outside our interest. Most EEG applications are concerned with Delta [0.5-3 Hz], Alpha [8-13 Hz], Beta [14-30 Hz], and Gamma [31,50 Hz] signals - it is thus sensible to create a high order bandpass filter to only allow a 0.5-50 Hz signal in order to reduce the relatively high amplitude of the 60Hz power line noise and unwanted lower frequency signals (the higher the order of the bandpass filter the larger the slope of bandpass edges).
I constructed a basic circuit using a AD620ANZ-ND instrumentation amplifier, a 2nd order butterworth bandpass filter, and 60 Hz notch filter (the inverse of a bandpass filter which suppresses a signal in a certain frequency range, in this case 60Hz region) however it was prone to much noise likely due to the fact that jumper cables were used which had a large lengths. Due to time constraints I was not able to get a printed circuit made which would theoretically reduce the noise. For a similar design of such a circuit the following resources are useful https://www.instructables.com/id/DIY-EEG-and-ECG-Circuit/ https://sites.google.com/site/chipstein/home-page/eeg-with-an-arduino
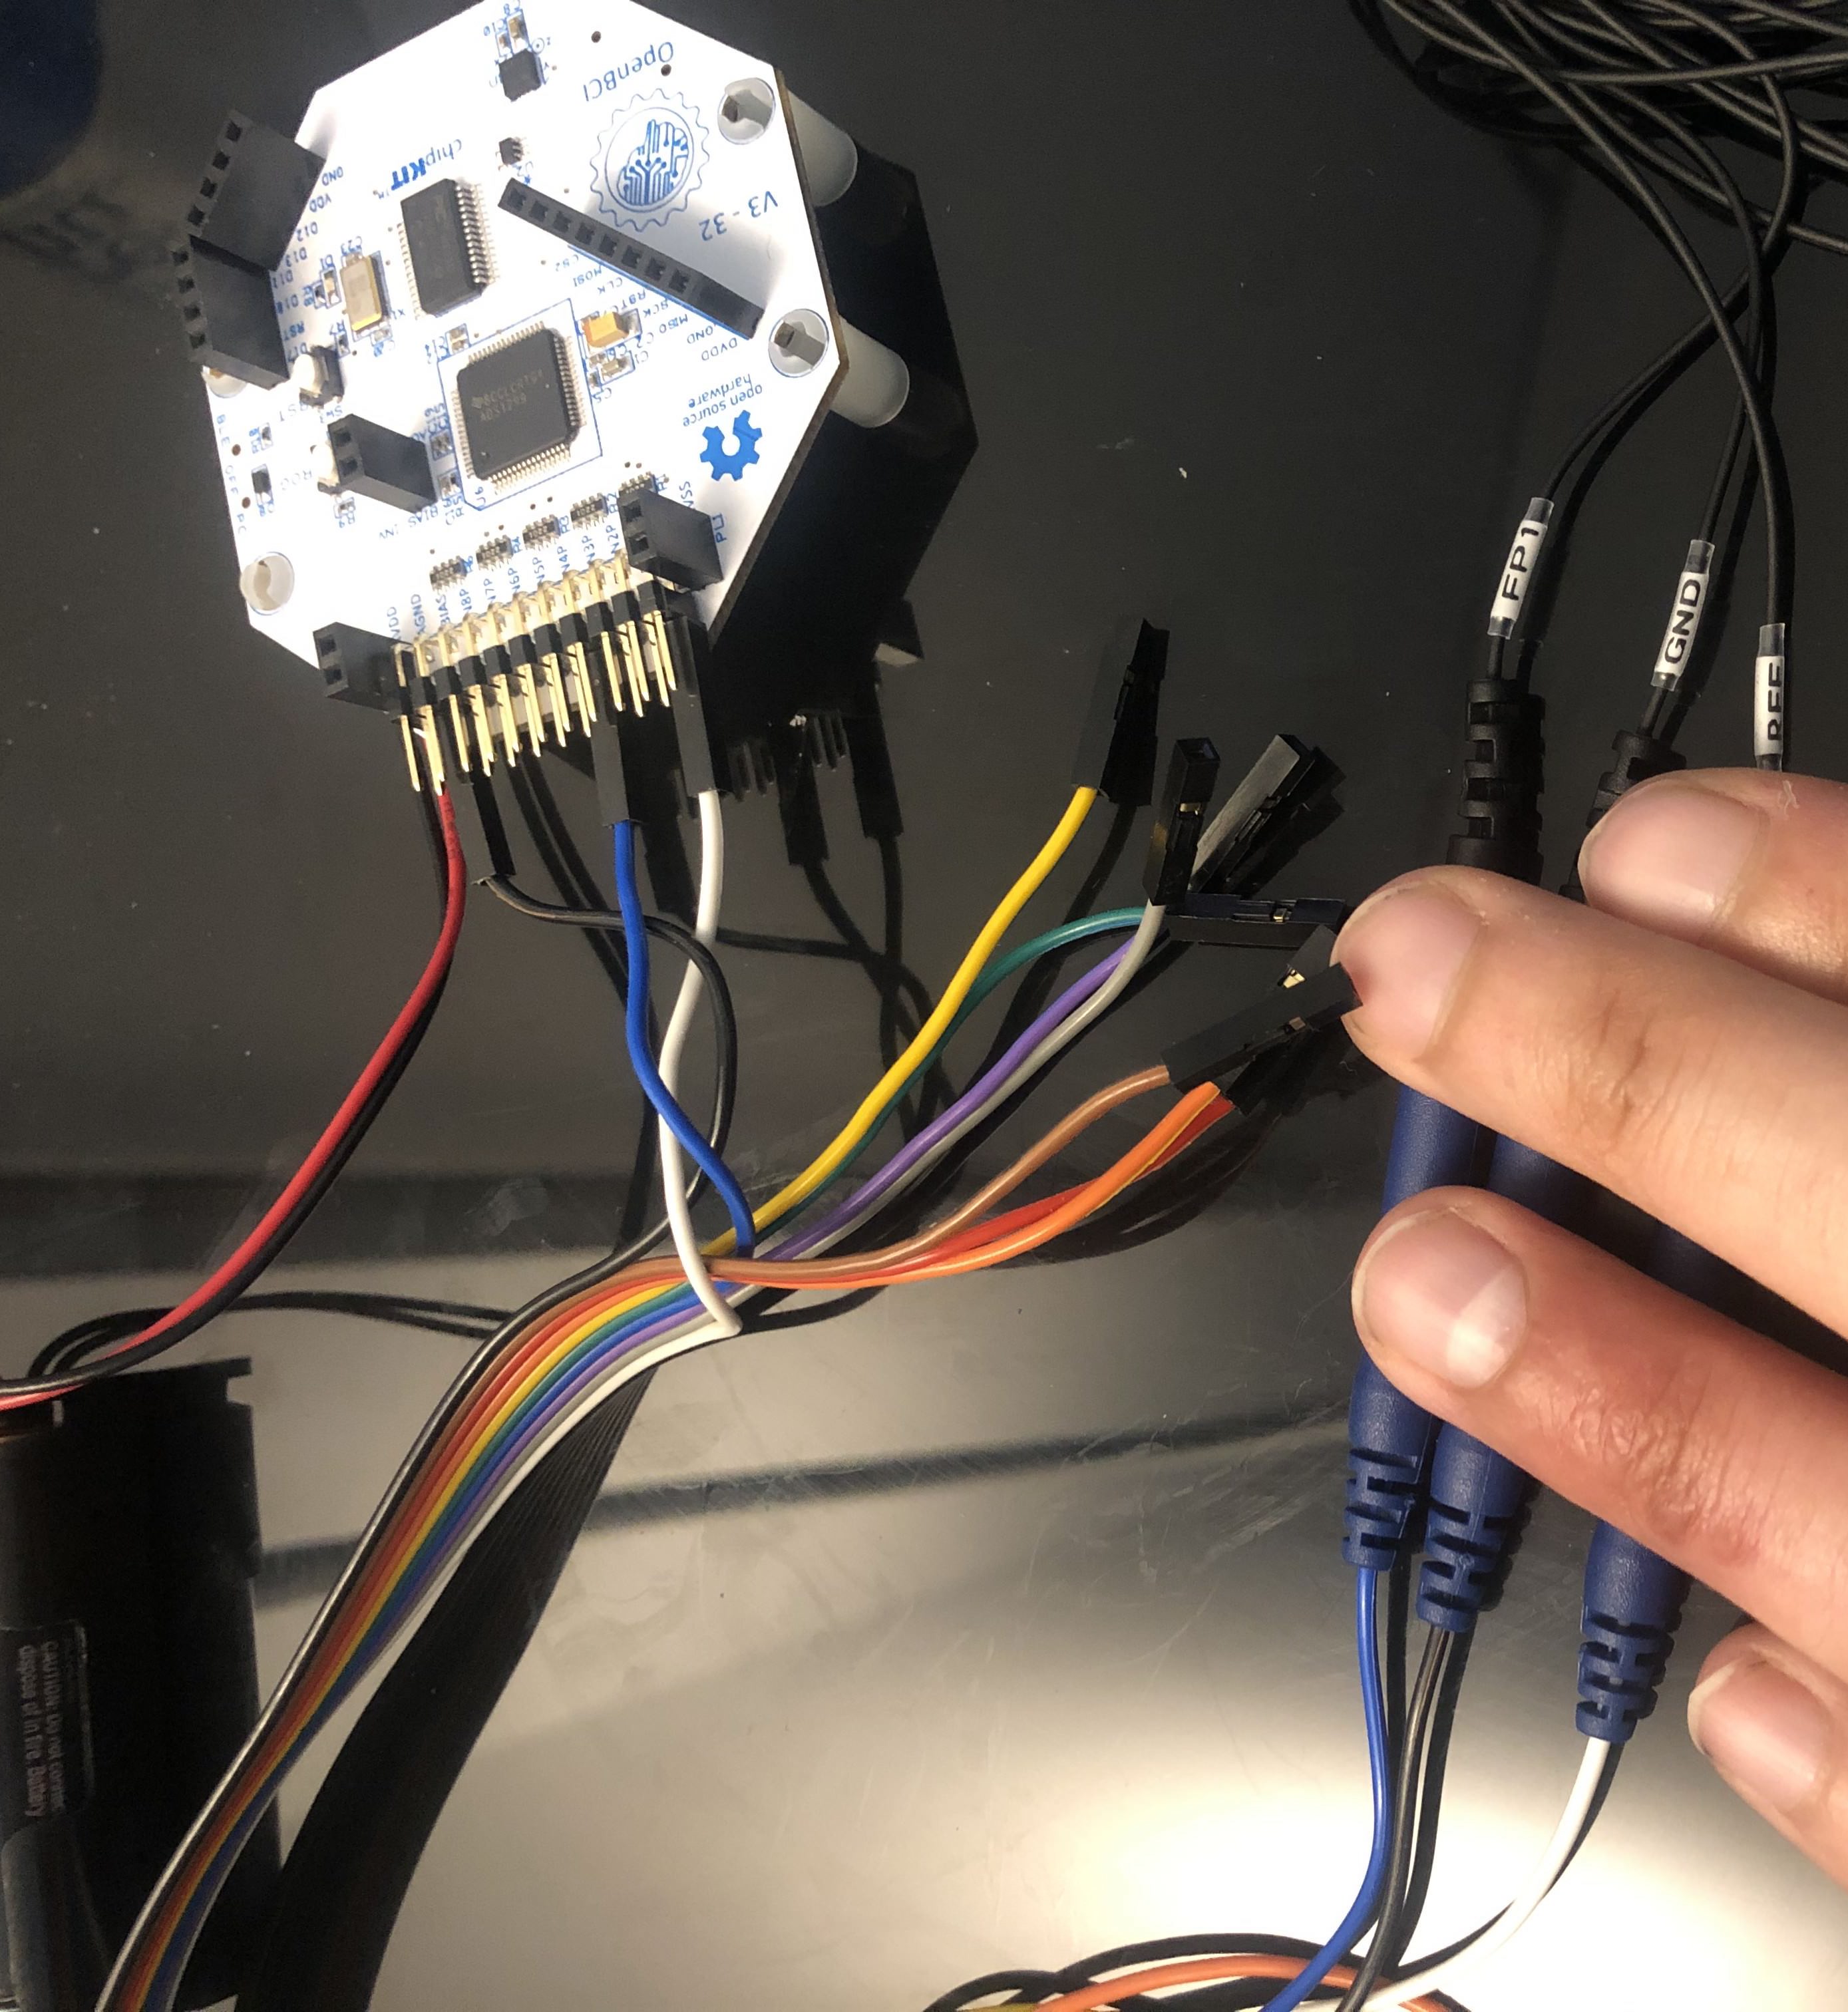
I ultimately opted for a pre-constructed circuit available from OpenBCI (Cyton Biosensing Board (8-channels)), which enabled me to concentrate more on an arguably more challenging aspect which is establishing proper scalp/electrode contact.
Note: If you are planning on building a DIY circuit one seemingly simple approach would be to amplify the signal using an instrumentation amplifier and process the signal on the software layer. Although there would likely be a significant performance cost to this. I have not attempted this but seems theoretically possible.
Using a Cyton board (or DIY board) there are three connections of interest. The electrode that will be placed in the FP1 10-20 position will have the primary signal of interest (frontal lobe), and can be connected into any of the channels N1P, N2P, ... N8P on the Cyton board (OpenBCI Cap connectors are labelled corresponding to 10-20 electrode positions). Secondly, the Reference [REF] electrode (CPz 10-20 electrode) should be connected to the SRB (bottom) pin of the Cyton board. Thirdly, the BIAS connection (the GND/AFz 10-20 electrode) should be connected to the BIAS pin on the Cyton board, which is responsible for additional noise cancelling.
When connecting the USB dongle to a computer, first connect the USB dongle and ensure that the BLUE light is on, and then turn the Cyton board ON, and turn to PC mode.
The signal that we are receiving from the EEG is a complex time varying electric potential, but we are mostly interested in the amplitude at certain frequencies therefore we must Fourier Transform the incoming signal to be able to make inferences from the signal. Furthermore, in order to further simplify the analysis of the signal in the context of this project, the average bandpower for Alpha and Beta frequency ranges must be computed (the integral of the power spectral density).
Building software from scratch to do this is often not required as there are quite a lot of available tools to be able to process EEG signals including Matlab which can also read time-series signals from Serial ports.
For this project we will be using OpenBCI’s open source software . OpenBCI’s software is completely customizable as it is open source, and even allows developers to add their own plugins into the software to make use of the already processed signals (Timeseries, FFT, and Bandpower).
Given that OpenBCI’s software processes the time-series signal and provides average bandpower bands for all of the frequency ranges that are of interest (Delta, Alpha, Beta, Gamam) a script can be used to ingest the OpenBCI data in real-time. There are many ways to get the data from OpenBCI, I will enable the Networking feature (by clicking on the dropdown in any of the four quadrants in OpenBCI and selecting “Networking”) and then selecting “UDP” in the Protocol dropdown. Furthermore, under “Stream 1” we select the “Bandpower” Data type, make sure the filter switch is on (clicking on 1-ON), and press “Start” to start the UDP server. The preceding steps will make OpenBCI send realtime bandpower data to the specified port (default: 12345) using UDP protocol.

The goal of this project is to be able to play Flappy Bird purely using brain oscillations measured by the EEG, with the ability to move the bird up when concentrating and moving the bird down when relaxing. In order to do this I wrote a Flappy Bird game from scratch in order to have complete control of the mechanics (speed of bird/pipes, distance between pipes and “gravity”). I chose to write the game in the browser as I found this to be the easiest approach.
As the OpenBCI software is now configured to serve real-time bandpower data, I wrote a simple server to listen on the specified UDP port and relay the bandpower data to the browser using websockets.
In order for the browser to be able to classify the incoming bandpower data into Relaxed & Attentive states, a simple (logistic regression) machine learning model was trained to be able distinguish these classes. I therefore wrote a tool into my game in order to record data corresponding to relaxed and attentive states, and later trained the model so it could be used in the browser. Prior to the machine learning approach I was using the ratio between the Alpha and Beta bandpower magnitudes, but determining a threshold ratio seemed a bit arbitrary and varied from session to session (likely due to many factors: not placing electrode in exact location, varying quality of contact to scalp ect.) - the machine learning approach yielded much better accuracies.
Using the trained machine learning model the browser could make predictions on the fly as it recieved bandpower data from our Node.js server which originated from OpenBCI, and move the bird up when making ATTENTIVE predictions and move the bird down when making RELAXATION predictions.
The browser game, server, and machine learning model that I wrote can be accessed on Github: https://github.com/AlejandroEsquivel/flappy-bird-brain-machine-interface. Prior to using these tools, Node.js must be installed on your machine (https://nodejs.org/en/download/package-manager/). Note: To be safe use Node.js version ~10.12.0 in order for dependencies to install successfully (If you have a newer version installed you can use NVM to switch between node versions ).
First, the dependencies must be installed by running "npm install" (using Terminal on MacOS or Linux, or Command prompt on Widnows) in the directory of the downloaded source code. The UDP server can be started by running "npm start" under the /server folder, and the game can be started by running "npm start" under the /game folder.
Once the server and game is running, you can use the game on the browser to record new Relaxation or Attention signals (ensure Cyton board & EEG cap connected & OpenBCI is configured to send data to UDP port as described above). Alternatively, you can skip this step and simply train the machine learning model by running "node classifier.js" under the /model folder, this will create a model file and refresh the browser automatically.
Now that a model file exists, by pressing "Start Game" the bird should move up and down depending on the (relaxed/attentive) state of the subject (or yourself).