
Superconductivity & DC Resistivity
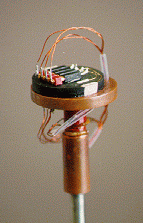
The Low Temperature Probe
The Complete Apparatus:
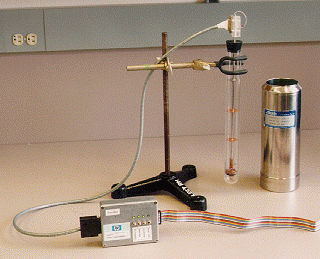 I have used the above equipment to make DC resistance measurements of both
Copper and Superconductor samples in the High School classes. The dewar
contains Liquid Nitrogen which has a boiling point of 77 Kelvin (or if you
prefer about -195 Celcius). The samples are attached to the probe which
is
suspended within the narrow quartz tube. Since the probe is not in direct
contact with the Liquid Nitrogen, it takes around 10 minutes for the
sample to cool to 80 Kelvin. The shaft of the probe is made of stainless
steel tubing because its low thermal conductivity minimizes the amount of
heat conducting down from above.
I have used the above equipment to make DC resistance measurements of both
Copper and Superconductor samples in the High School classes. The dewar
contains Liquid Nitrogen which has a boiling point of 77 Kelvin (or if you
prefer about -195 Celcius). The samples are attached to the probe which
is
suspended within the narrow quartz tube. Since the probe is not in direct
contact with the Liquid Nitrogen, it takes around 10 minutes for the
sample to cool to 80 Kelvin. The shaft of the probe is made of stainless
steel tubing because its low thermal conductivity minimizes the amount of
heat conducting down from above.
The small grey box contains some
amplifier
circuitry used to aid in the resistance measurement described below. A
simple diode attached to the probe is used to determine its temperature.
The ribbon cable leaving the grey box is connected to a PC via A/D cards
so that the results can be viewed graphically in real time.
Both samples
have room temperature resistances that are less that 10 micro ohms which
means that it is impossible to measure their resistance with a simple
multimeter. To avoid the problem of measuring the resistance of the leads
to the sample, I
use a "4-wire" test. To do this, separate wires are used for sending
current
through the sample and for measuring the accompanying voltage drop. The
voltage drop across the sample is never more than 100 millionths of a volt
and thus requires a rather substantial amplification before the computer
can accurately measure it. The resistance of the diode, which varies
linearly with temperature in this temperature range, is also measured
with a 4 wire method but its voltage is large enough to be measured
without any amplification.
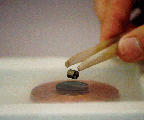
The base of the probe:
 The above photo shows the base of the probe with the Superconducting
sample attached. The sample is the round black disk beneath the small
red clip. The 4 wire electrical conection is accomplished with the
red clip. If you look closely you can see the small Gold (bright
yellow) wires that are
used to make the final connection to the sample.
The above photo shows the base of the probe with the Superconducting
sample attached. The sample is the round black disk beneath the small
red clip. The 4 wire electrical conection is accomplished with the
red clip. If you look closely you can see the small Gold (bright
yellow) wires that are
used to make the final connection to the sample.
The Two Samples:
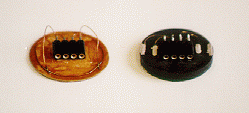 Here you can see both samples side by side. They are attached to the end
of the probe by a thin layer of grease. The copper sample is actually
only a 1 cm length
of #22 Cu wire that is glued down to the disk.
Here you can see both samples side by side. They are attached to the end
of the probe by a thin layer of grease. The copper sample is actually
only a 1 cm length
of #22 Cu wire that is glued down to the disk.
The DC Amplifier:
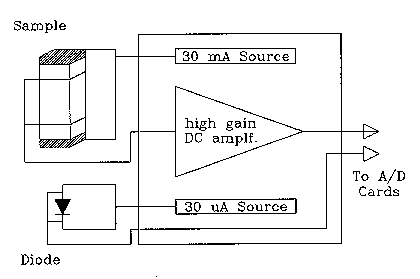 The grey amplifier box contains the above circuitry. Notice that the
sample has 4 separate wires attached and that the outer two are used to
provide the current while the inner two monitor the voltage drop. The gain
on
the amplifier is in the order of 50 000. Notice that the diode current is
quite small at only 30 microamps.
The grey amplifier box contains the above circuitry. Notice that the
sample has 4 separate wires attached and that the outer two are used to
provide the current while the inner two monitor the voltage drop. The gain
on
the amplifier is in the order of 50 000. Notice that the diode current is
quite small at only 30 microamps.
Links To and Fro..
Back to the Physics Outreach Home
Page
Back to the Superconductor
Demo Menu
Onward to Measurements
on Copper