University of British Columbia
PHYS 420C Physics Demonstrations
By S. David Lalonde, contact email: lalonde@gmail.com
Cubes & Tubes: A Demonstration of Electromagnetic Induction & Lenz’s Law
Lesson Purpose and Overview
This is a lesson on electromagnetic induction and Lenz’s Law that includes a physical demonstration to help Physics 12 students predict and observe some of the concepts of electromagnetic induction. The lesson will demonstrate aspects of Faraday’s Law and Lenz’s Law and is intended to be included in a Physics 12 unit on Electromagnetism.
The physical demonstration is designed to show students how a magnet dropped through a tube induces an electric current in a closed-circuit coil or induces eddy currents in a solid metal tube. Students will predict and observe how differences in the tubes affects the time it takes a magnet to fall through them. For example, students will compare a magnet’s drop time through: plastic tubes with and without a surrounding wire coil, high and low conductivity metal tubes, solid tubes and tubes with open vertical slits, and thin wall versus thick wall tubes. Students will then correlate their observations to electromagnetic theory.
A magnet will be seen to slow down when its permanent magnetic field interacts with and generates electric currents (Faraday’s Law) in a wire coil or in a solid metal tube as the magnetic field moves through, with the induced currents generating magnetic fields in opposition to the change in flux from the moving magnet (Lenz’s Law). A series of three or more tubes (variable, depending on the size of demonstration built/used by the instructor) will show differences in the time it takes a magnet to fall down each tube. The direction of the induced current in a closed-circuit coil, and the resultant magnetic field from this induced current, will be determined using Lenz’s Law.
Big Ideas
Faraday’s Law: A change in magnetic flux will create a voltage (or emf) in a conductor. It may then induce a current in a closed circuit.
Lenz’s Law: The induced current flows in the direction that will create a magnetic field opposing the change in magnetic field that created the current.
Lesson Content
Electromagnetic Induction & Faraday’s Law.
What is Lenz’s Law?
Demonstration of electromagnetic induction, eddy currents, and Lenz’s Law.
Applications of electromagnetic induction and eddy currents.
Learning Goals
Describe the magnetic fields of a permanent magnet, a current carrying wire, and a solenoid (or electromagnet).
Use right-hand rules to determine the direction of the magnetic field for a current carrying wire and a solenoid.
Use Lenz’s Law to determine the direction of a current induced in a coil due to a changing magnetic field.
Understand electromagnetic induction and what factors influence the direction and magnitude of induced currents.
Physics Principles
Faraday's Law tells us that electromagnetic induction is the production of an electromotive force (emf, or voltage) across an electrical conductor in a changing magnetic flux. The emf results in the flow of charge (electrons) through the conductor.
Lenz's Law gives us the direction of the induced EMF (and induced current), such that the induced current will always oppose the change producing it.
Pedagogy
This lesson uses visual learning with an online interactive demonstration (Faraday's Law) and a physical demonstration, kinesthetic learning with students having hands-on involvement with the physical demonstration, and auditory learning with a lesson presentation, discussion and explanation of the key learning objectives.
Students will be presented with information about electrical induction, specifically the interaction of permanent magnets with wire coils and solid metal tubes. Students will then actively participate in predicting outcomes for the time it takes for magnets to drop through various types of tubes, and individual students will directly participate by dropping the magnets through the tubes.
This lesson is intended to be given to Physics students in grade 12 during a unit on Electricity and Magnetism.
Curricular Competencies
Demonstration Design
The demonstration design is primarily a sturdy stand (for example, made from wood, Aluminum, or similar non-magnetic materials and non-magnetic fasteners) with a number of non-magnetic tubes (~1 m long), the type and number of which are dependent upon the budget and time afforded to the instructor.
Permanent Neodymium magnets of either a cube shape (for square tubing) or a cylindrical shape (for round tubing) are also required. The magnets should be of a size that allows them to drop freely through the tubes without getting hung-up and without flipping over. For example, if you had 1” ID round tubes, you could use ¾” cylindrical magnets, or for ¾” ID tubes use ⅝” cylindrical magnets. The thickness of the tubes matters only in so much as the thicker the metal the larger the induced eddy currents and the slower the magnets will fall through the tubes. Thicker is better and the results will likely be more impactful to students! Of course, tubes with different thicknesses are encouraged so that students have an opportunity to predict and observe the difference in drop times for tubes with different wall thicknesses.
Spherical magnets are not recommended as they are difficult to orient their poles vertically when dropped, they may spin as they fall, and this will shift the orientation of their North and South poles as they drop through the tubes. It is preferred to be able to keep the North or South pole of the magnet up so that students may predict the direction of current induced in the wire coil tube.
Demonstration Construction
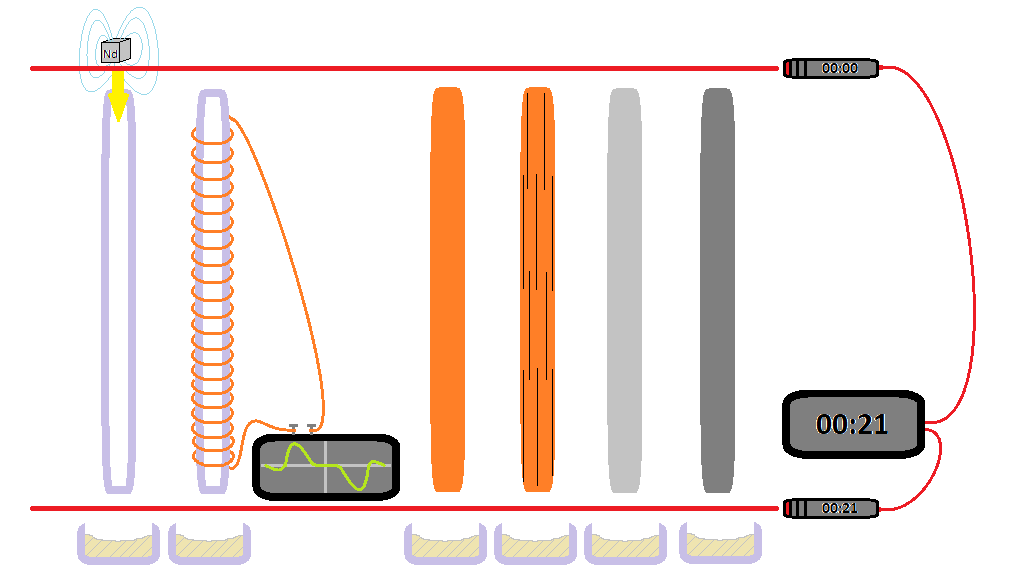
Figure 1: Demo Design Schematic
The critical materials to acquire are a number of clear plastic tubes and solid metal tubes with the same internal dimensions, e.g., ID = ¾” or 19 mm, and all having the same length, about 1 metre.
Round tubes are easier to source than the square tubes used in my original demonstration. For example, I could not source square Copper tubing, but round Copper tubing is readily available from most local metal supply shops. As are round or square tubes in Aluminum and stainless steel. Amazon is another source for the plastic and metal tubes and magnets required for the demonstration.
Example Source for Metal Tubes:
https://www.metalsupermarkets.com/metals/copper/copper-c101-round-tube/
Example Source for Plastic Tubes:
https://www.amazon.com/s?k=acrylic+extruded+tube&ref=nb_sb_noss_2
Example Source for Neodymium Magnets:
It is recommended to have the following tubes in the demonstration:
2 x clear acrylic/plastic tubes - One will provide the students with a baseline for the drop time of the magnet accelerating through 1 metre, with no influence from the material of the tube. Being clear is nice so the students can see the magnet falling. The second clear plastic tube will be fitted with a tightly wound coil of heavy gauge copper wire. This will be connected to an ammeter (use LoggerPro or similar) to observe the induced current when a magnet is dropped through the coil.
2 x Copper tubes - 1 will remain solid and 1 will have vertical slits cut into it (to reduce the size of the eddy currents that can form in the tube).
2 x Aluminum tubes with different wall thicknesses.
1 x stainless-steel tube (ensure the alloy is non-magnetic) to observe how a metal with very low conductivity interacts with the dropping magnet. Students will observe the dramatic difference in drop time between a Copper tube and a stainless-steel tube.
For the magnets you could try different sizes of magnets (different mass with the same relative field strength), and different grades of Neodymium (same mass with varying field strength).
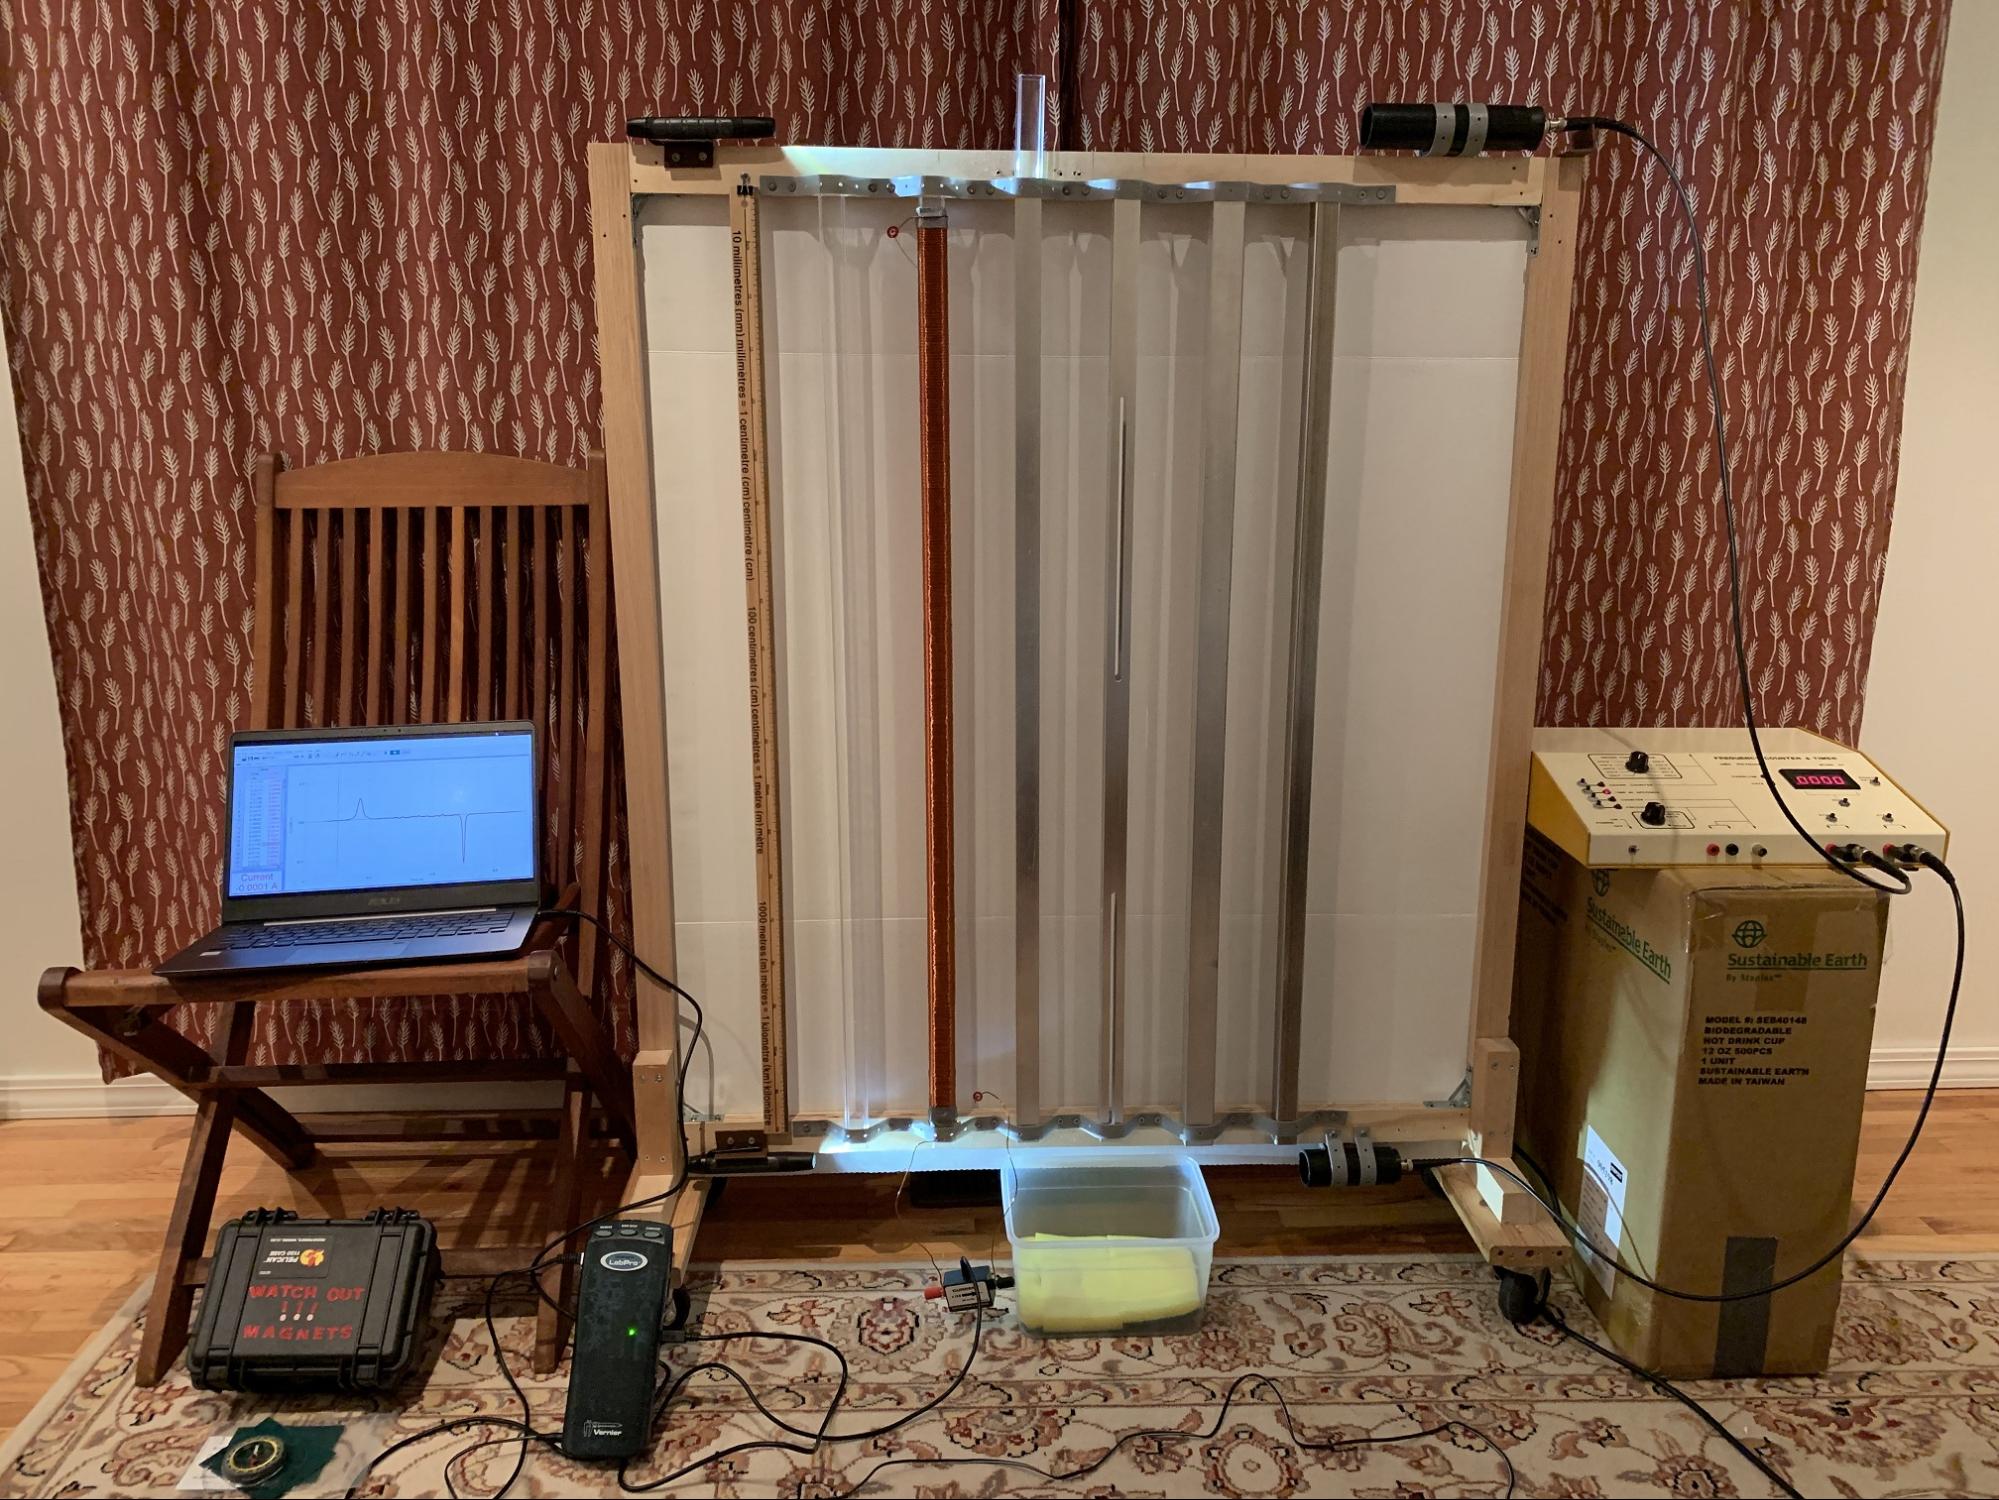
Figure 2: Demonstration Set-Up
Lesson Plan
At the beginning of the lesson state the main goal for the lesson: Understanding Electromagnetic Induction and Lenz’s Law, and discuss the big ideas (see presentation).
Assess the students’ prior knowledge of electricity and magnetism with a pre-lesson written quiz that is provided as a printed hand-out. The time requirement will be 5 to 10 minutes to write the quiz and around 5 minutes to review and discuss the students’ answers.
After reviewing the overall quiz results determine how much time to spend on a review of electromagnetic induction (hopefully this lesson will be carried on as an extension from the students’ previous lessons), Faraday’s Law, and the creation of electric current in a conductor due to a changing magnetic flux. The review part of the lesson will be conducted with the projected presentation.
The presentation can be supplemented with notes and sketches on a whiteboard, mostly in response to student queries.
Next introduce Lenz’s Law and explain how it allows us to understand physically what is happening when a magnet induces current in a coil. Present the “right-hand” rule for the direction of the magnetic field due to a current carrying wire.
Lenz’s Law states that the direction of the induced EMF is always such as to oppose the change producing it. Another way is to say that the direction of the induced magnetic field will oppose the change producing it. However, there will only be an induced magnetic field if there is an induced current, which will only happen if there is a complete circuit.
Show the use of the “right-hand” rule to determine the direction of current flow. With the thumb of the right hand in the direction of current, your fingers curl to show the direction of the magnetic field around the wire. In a coil, the curl of the fingers will show the direction of the magnetic field inside and outside the coil.
Present and discuss eddy currents, circuits (loops) of electric current induced within solid conductors by a changing magnetic field, and are also described by Faraday’s Law. However, they are more difficult to measure and observe as they are in a solid conductor and you can’t easily place a voltmeter to measure the current. Looking at it through the perspective of Lenz's law, just as in the case of a wire coil, an eddy current creates a magnetic field that opposes the change in the magnetic field that induced it. The induced eddy currents flow in closed loops perpendicular to the magnetic field. Any change in magnetic field flux can create eddy currents in nearby metals, for example, fields from an AC electromagnet, transformer, electric motor, or the motion of a permanent magnet. The magnitude of the current is proportional to the strength of the magnetic field, the area of the loop (area and thickness of the nearby conductor), the rate of change of the magnetic flux, and the conductivity of the metal.
Following the Lenz’s Law portion of the presentation, discuss the proposed demonstration, show them the demonstration apparatus, and ask the students to think about what might happen when we drop a magnet through a tube of conductive metal.
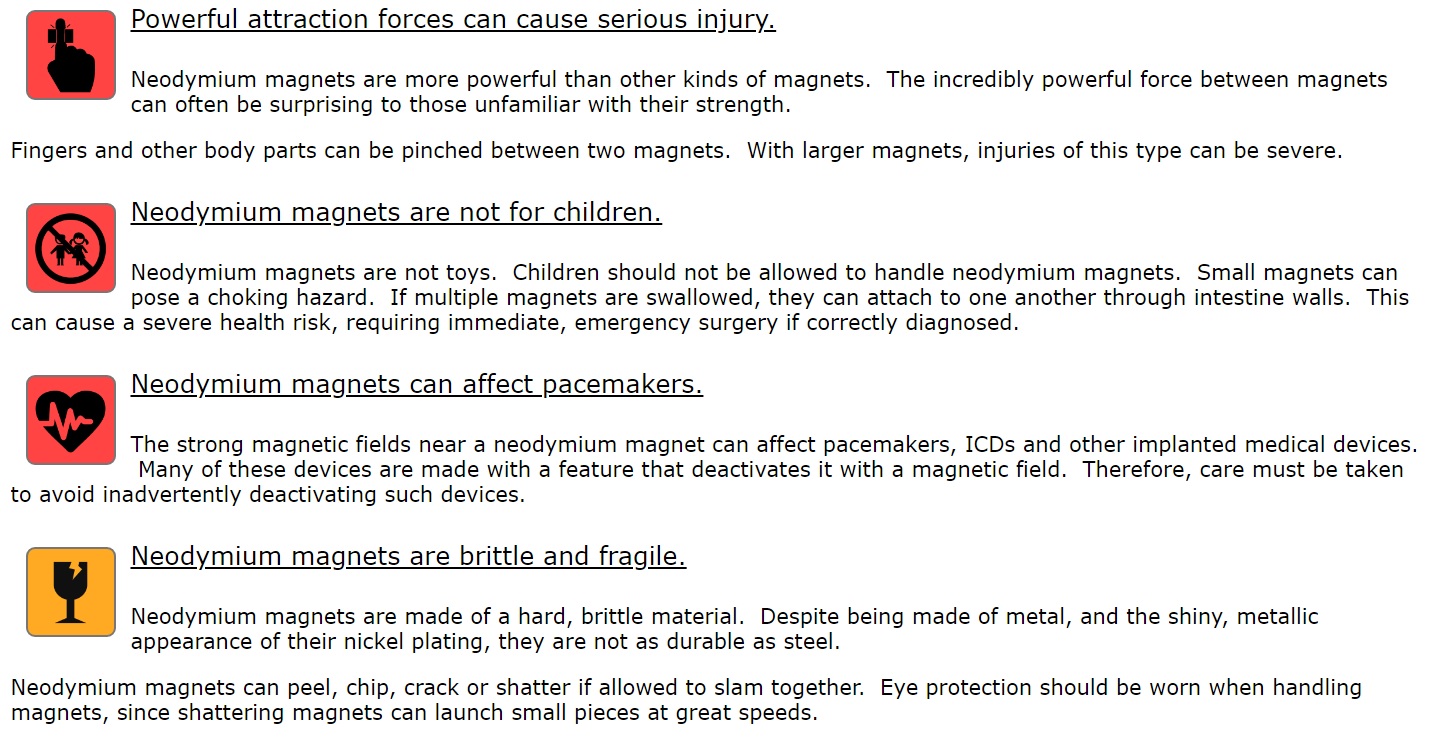
Don’t forget to do a review of the safety requirements for handling powerful magnets before allowing the students to handle the magnets used in the demonstration.
Figure 3: Safety when Handling Magnets
Interactive Demonstration
The different experimental iterations suggested are as follows (all initial test drops will use the ¾” cube N42 Neodymium-Iron-Boron [NdFeB] magnet, all data will be recorded on the student’s hand-out worksheet:
1. Through a clear plastic tube with no conductive metal around it. This will be used as a baseline to compare to all the other drop tests. The only forces involved are gravity and friction (due to potential contact of the magnet with the sides of the tube, and air drag resistance). Photogates connected to LoggerPro will record of the time it takes the magnet to drop from the top to the bottom of the tube.
2. Through a plastic tube with a long coil of wire (solenoid) that is not connected (open-circuit).
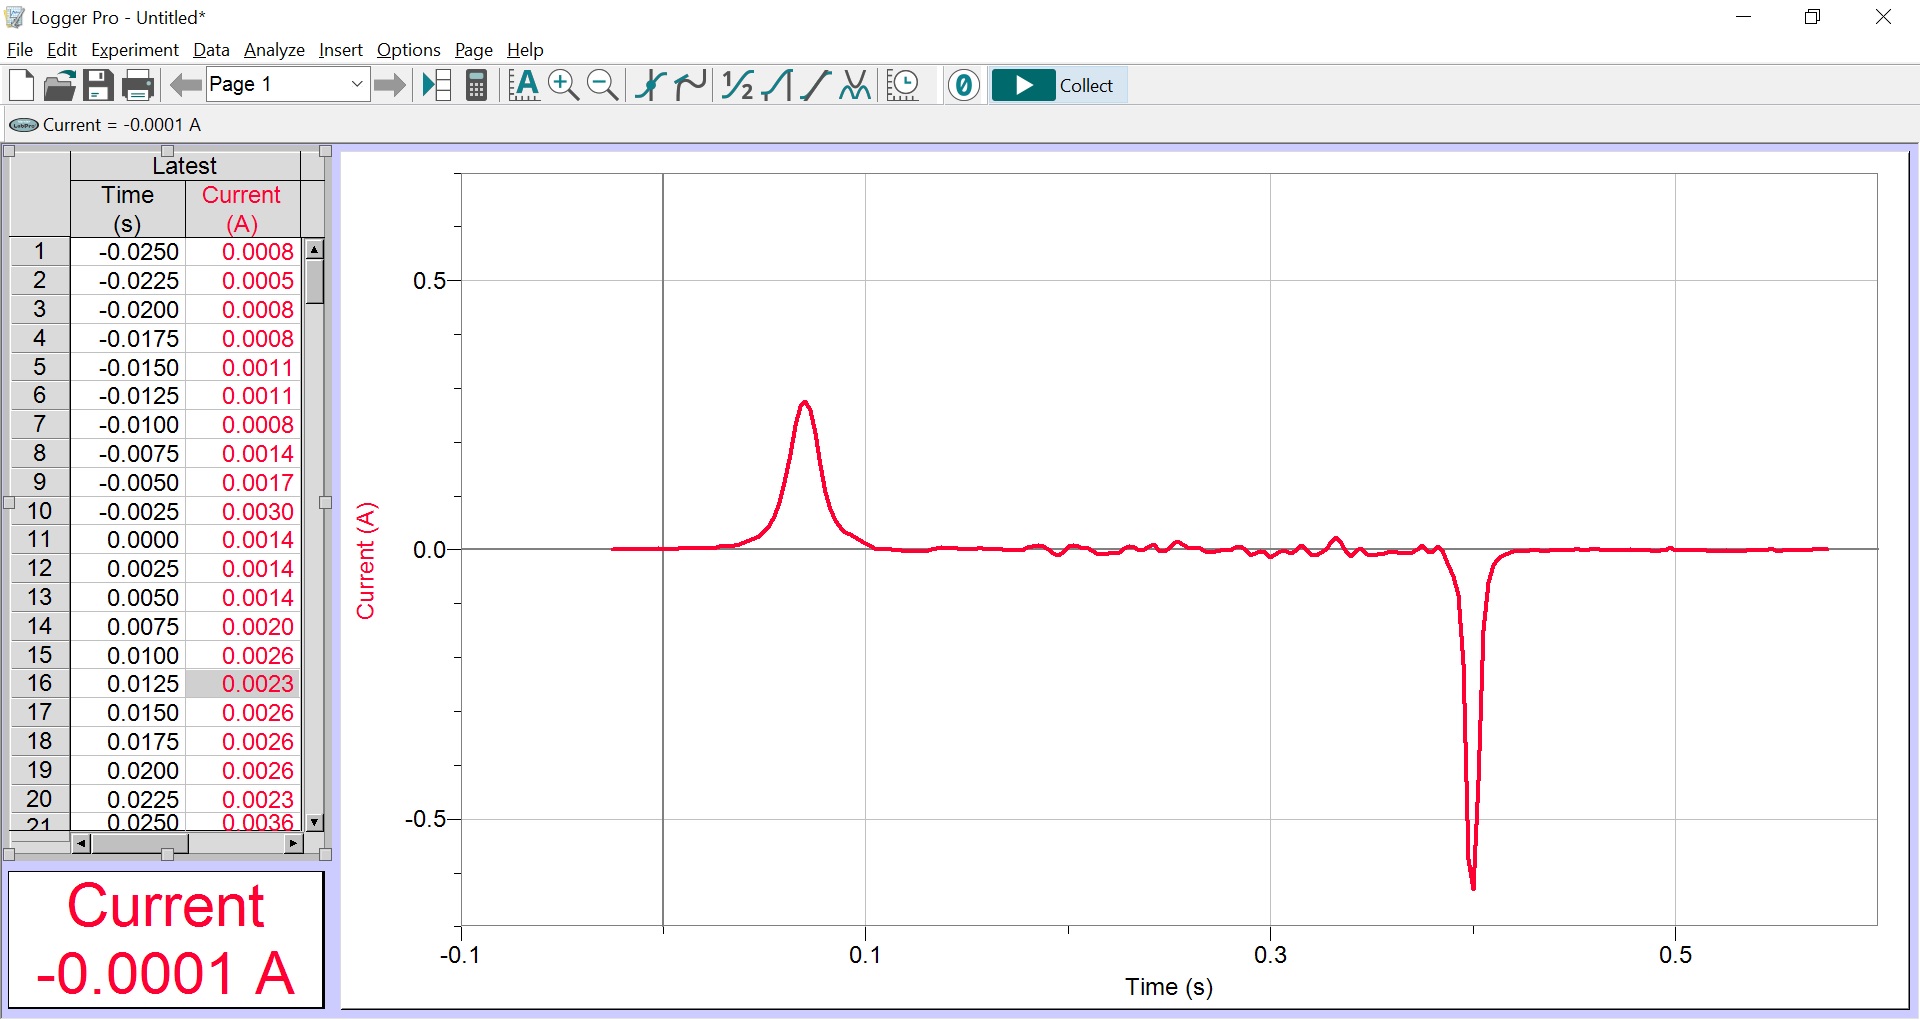
3. With that same coil now connected (closed-circuit). LoggerPro will be used to record and show that electricity is generated in the closed-circuit coil. For more advanced students ask them to observe and suggest explanations for the shape of the graph of the induced current recorded by Logger Pro.
Figure 4: Current from Wire Coiled Tube
4. Through a solid Copper tube, demonstrating the generation of eddy currents.
5. Through a slotted Copper tube. A solid Copper tube will have fine vertical slots cut into it. This will act to disrupt the formation of large eddy currents and reduce the slowing effect on the dropping magnet.
6. Through an Aluminum tube. Aluminum has around 50-60% of the electrical conductivity of Copper.
7. Through a stainless-steel tube. Stainless steel has only about 2.3% of the electrical conductivity of Copper.
The direction of the induced current in the closed-circuit coil, and the resultant magnetic field from this induced current, will be determined using Lenz’s Law and the “right-hand” rule. A simplified coil in the same orientation as the coil around the plastic tube will be drawn on the whiteboard and the students will be encouraged to show application of the “right-hand” rule to determine both the direction of the induced current and the direction of the induced magnetic field.
Figure 5: “Right-Hand” Rule - Direction of the Magnetic Field for a Current Carrying Wire
During the demonstration have the students drop the magnets themselves, write their predictions of outcomes, and record the drop times and their observations on their hand-outs.
Some of the questions to be answered, predictions made (will the magnet fall faster or slower), and tests performed are as follows:
Depending on the time available additional experimental trials may be made and recorded by the students. This could include different orientation of the magnet’s field, e.g., N/S horizontal, and different strengths of the ¾” cube magnet, N42 (0.57 Tesla surface field at poles) versus N52 (0.65 T). They could also try other magnet shapes, such as an N42 ¾” sphere (0.88 T, more concentrated field at the poles), an N42 ¾” cylinder (0.59 T), and other non-magnetic materials, such as a non-magnetized (though ferromagnetic, so keep away from the NdFeB magnets) chrome plated steel ¾” sphere and a non-magnetic stainless steel ¾” sphere.
To accurately measure the time for the magnet to pass through the various tubes during each experimental observation you could use a Photogate system similar to the one shown in the Demonstration Set-Up photo, or assign a student to a stopwatch to time all the drops.
Logger Pro is used to capture the current reading from the closed-circuit coil when the magnet is dropped through the coil. A simple ammeter could also be used.
After the demonstration review what the students have learned. Ask how their predictions did or did not come true, and why? Get them to explain in their own words the big ideas introduced at the beginning.
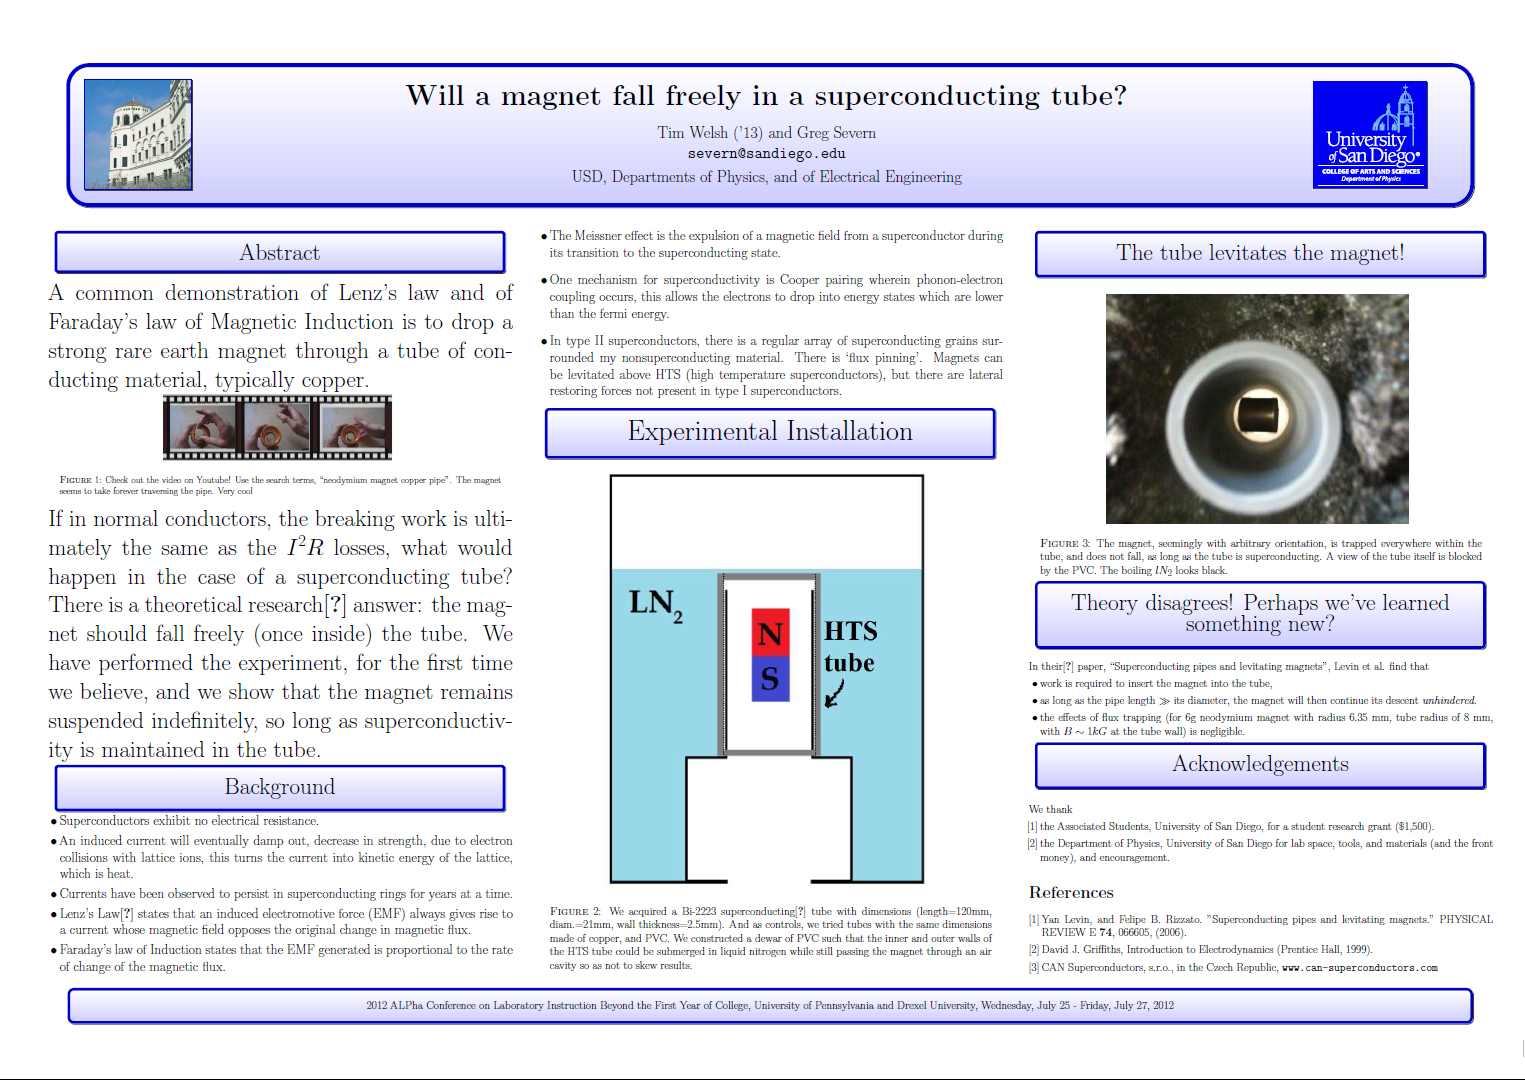
Discuss real world applications of electromagnetic induction (e.g., regenerative braking in electric vehicles, hydroelectric generators) and eddy currents (e.g., metal melting furnaces in the metal casting industry, induction cooktops, airport security metal detectors). Lead a short discussion about applications students may know of, or may dream up. End with a discussion of what might happen if we were to drop a magnet through a tube made of superconducting material?
Assess overall learning with a post-demonstration quiz.
